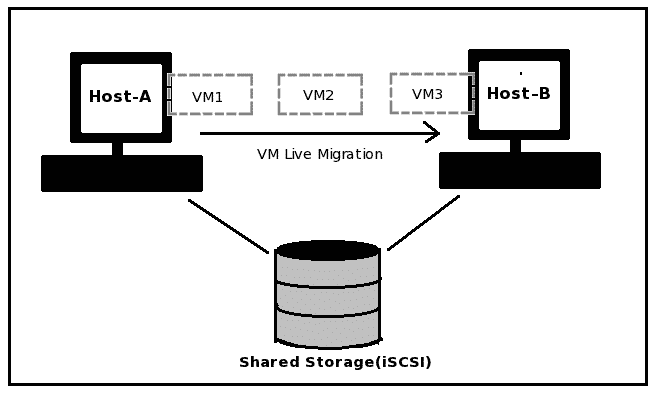
If you are using KVM to run virtual machines in your environment then, you can make use of one of the fantastic features of KVM. i.e. Live Migration of virtual machines. So, first we will see what is the exact meaning of KVM live migration.
KVM live migration is the process of moving the virtual machine from one host to other.
Lets see in which situation, one will migrate virtual machine from one host to other:
– when we need to upgrade, add, or remove hardware devices on the host, we can live migrate virtual machines to other hosts. This means, there will not be any downtime to any of virtual machine during Host upgrade activity.
– Energy saving. For ex. consider there are two hosts(host-A & Host-B). On Host-A there is only one running virtual machine, where on Host-B, there are 6 virtual machines already running. But, Host-B have enough resources(CPU,RAM etc.) to accommodate few more virtual machines. So in such scenario, we can migrate the virtual machine from Host-A to Host-B and further power off Host-A.
– Geographic migration. We can migrate the vm to other host which might be located on different geographic location in case of any Natural disaster.
Prerequisites for Live Migration:
– Storage which is being used for storing the virtual machines disk should be shared. Supported protocols:
—
Fibre Channel-based LUNs
iSCSI
FCoE
NFS
GFS2
SCSI RDMA protocols (SCSI RCP): the block export protocol used in Infiniband and 10GbE iWARP adapters
—
For ex:
– If firewall is enabled then, required ports should be opened on sorce and destination hypervisor(22,80/443,49152-49216).
– FQDN of destination host should be resolvable.
– Fedora version should be same on both source/destination hypervisor.
– libvirtd service should be running.
=======
vm migration can be live(when vm is in running state) OR offline(vm in paused state).
live migration: In live migration, you can live migrate the vm from one host to other when vm is in running state. End user of vm will never know when vm is being migrated. In back end, KVM from source host starts sending memory pages of virtual machine to destination host. Also, it monitors for change in memory pages which are already sent to destination. If it founds any then, it will re transfer those pages to destination host.
offline migration: In offline migration, vm is paused/suspended on source host then, memory of guests gets transferred to destination and finally vm get resumed on destination host.
If the virtual machine modifies pages faster than KVM can transfer them to the destination host, then in such scenario to speed up the vm migration process you can suspend the guest on source host and perform offline migration.
Migration speed of any virtual machine is totally depends on network bandwidth in your environment.
– You can check default migration speed by:
—
# virsh migrate-getspeed
—
– To manually change default migration speed as per your requirement:
—
—
With above command we are setting 100mbps speed for guest(test_vm) migration.
– Login to iSCSI target:
Logging in to [iface: libvirt-iface-05ce9ce1, target: iqn.1992-08.com.netapp:sn.135107447, portal: xx.xx.xx.xx,3260] (multiple) Starting iscsid: [ OK ] Login to [iface: libvirt-iface-05ce9ce1, target: iqn.1992-08.com.netapp:sn.135107447, portal: xx.xx.xx.xx,3260] successful.
# fdisk -l /dev/sde
Disk /dev/sde: 31.1 GB, 31142707200 bytes 64 heads, 32 sectors/track, 29700 cylinders Units = cylinders of 2048 * 512 = 1048576 bytes Sector size (logical/physical): 512 bytes / 512 bytes I/O size (minimum/optimal): 512 bytes / 512 bytes Disk identifier: 0x00000000
– create an LVM-based storage pool with VG:test_kvm, and PV:/dev/sde
—
Pool lvm_stoage_pool defined
– Build storage pool
# virsh pool-build lvm_storage_pool
Pool lvm_stoage_pool built
—
– Activate pool
# virsh pool-start lvm_storage_pool
Pool lvm_stoage_pool started
– Check available storage pools:
virsh # pool-dumpxml lvm_stoage_pool
– Create new vm:
—
—
– On 2nd host, create same storage pool.
– Set migration speed to 1Gbps.
—
1000
– Now, lets try live migrating the vm:
—
—
– From libvirt.logs:
—
[…]
2013-10-14 10:04:51.902+0000: 2250: debug : virDomainMigrateSetMaxSpeed:16545 : dom=0x7f43dc00b310, (VM: name=test_vm, uuid=a7af86ca-38f8-ba79-5ca6-a692090472ce), bandwidth=1000, flags=0
—
Nice article Pratik!! Thanks for your contribution!!!
Post is quite difficult to understand for a newbie to understand, means how can i connect one host with other?and how to implement shared storage(nfs)?
Post is quite difficult to understand for a newbie, means how can i connect one host with other?and how to implement shared storage(nfs)?
Makrand, somehow I missed this comment..
>>
means how can i connect one host with other?and how to implement shared storage(nfs)?
>>
In reality, you dont want to connect both hosts.. The only requirement is shared storage has to be viweable ( accessible) by both hosts..
regarding “shared storage(nfs)”: it is that easy as creating a NFS share from any of your nfs servers and making it visible to both hosts.. Basically the VM image will be stored under the nfs shared stroage . so that both hosts can see the image..
Please let me know if you need any further clarification..